Configure of Xbee using Arduino UNO


Hello Friends J
This will help you
configure a series of 2 XBee directly via an Arduino Board without any need of
separate USB adapter.
Step 1: Requirements for configuring the XBee
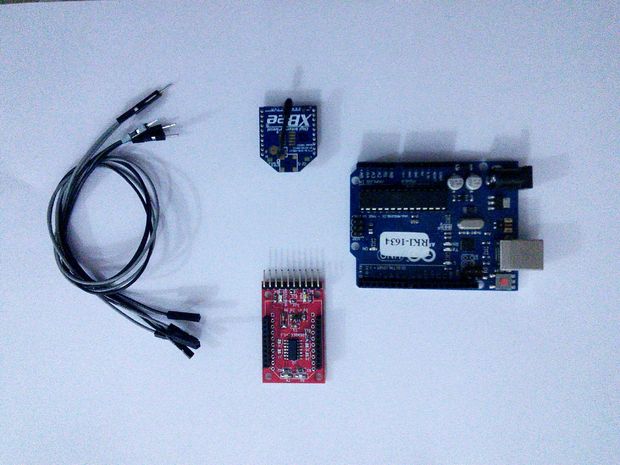
These are the
requirements to configure your xbee
1) Arduino UNO board
2) Xbee Zigbee shield(can also connect the pins of XBee directly to the Arduino)
3) Xbee Series 2
4) Male to Female wires
5) Arduino IDE
1) Arduino UNO board
2) Xbee Zigbee shield(can also connect the pins of XBee directly to the Arduino)
3) Xbee Series 2
4) Male to Female wires
5) Arduino IDE
Note: This tutorial assumes that we have enough
understanding about the Arduino and that we can connect and upload the code via
the Arduino IDE.
Step 2: Preparing the Arduino.

Firstly we have to set
up the Arduino by uploading these simple codes. At this point Xbee is not
connected with the Arduino.
Step 3: Connecting the Arduino
with the XBee shield


Connect the Arduino to
the xbee shield as shown in the sketch.
Please note that Tx of Arduino has to be
connected to Tx of Xbee and Rx of Arduino to Rx of Xbee. Make sure to connect
the 3.3v of the Arduino to Xbee's VCC and not the 5v as this might damage the
xbee.
For the ttl board that I purchased from robomart.com
I was asked to connect the reset of the board to reset of the Arduino board,
this can be seen in the second pic.
Step 4:


Once the connections
are made open the Xctu software and use it test to detect the Xbee attached. If
"All is well" then you can see the device is of the Xbee attached if
not don't worry change your baud rate to 115200 and check. If this also doesn't
work please do leave your comment I will try my level best to help you out.
If the device is detected now move to modem
configuration tab and select the always update firmware and click on read,
this will read the current configuration of the modem mostly it will be in
router mode, in this case it's in API mode as I have configured it so.
Step 5: Reference and thanks
Hope this will help you
to configure your XBee if you face any difficulty please let me know, always
there to lend my hand.
Thank you for spending your valuable time to
read this post. Please leave your feedback.
No comments:
Post a Comment